Beautiful Fluffy Clouds in Photoshop
Step 1
Create a new document in Photoshop. For this image I chose the A4 format. You can find it under the International Paper Preset. Then in the Background layer and apply a Layer Style with Pattern Overlay. For the Pattern, select the Linen Weave, it's a default pattern in Photoshop.

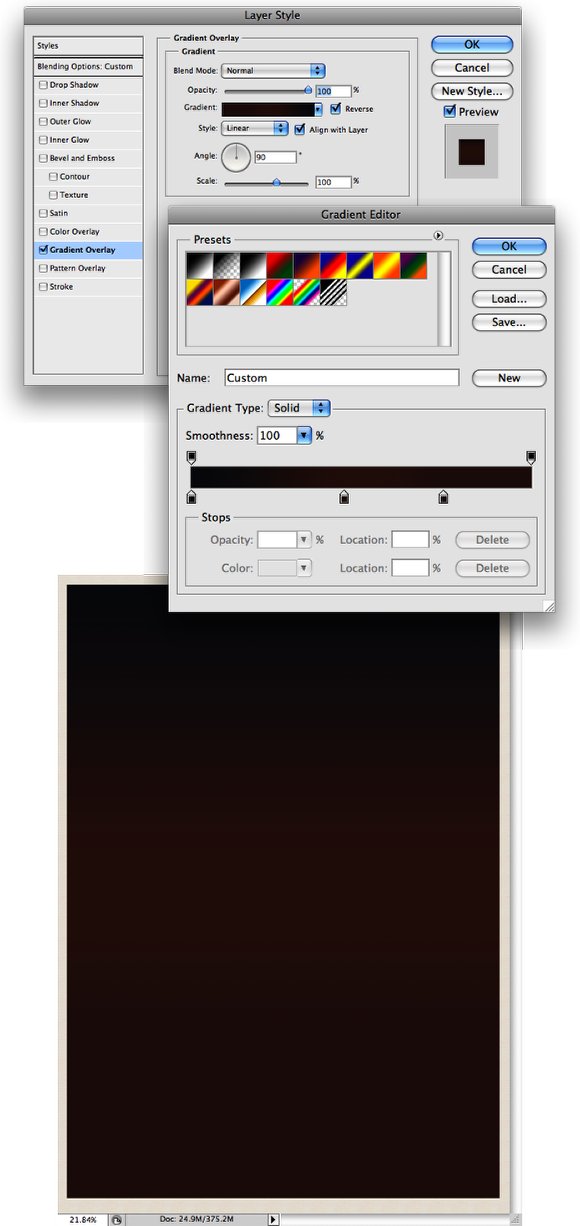
Step 2
Add a new layer and create a rectangle with the Rectangle Tool (U). Make it slightly smaller than the background, so it will have some borders. After that apply a Gradient Overlay via Layer Styles. Use Linear for the Type, 90° for the Angle and for the colors use: #12141c, #3e221a, #341f1b.
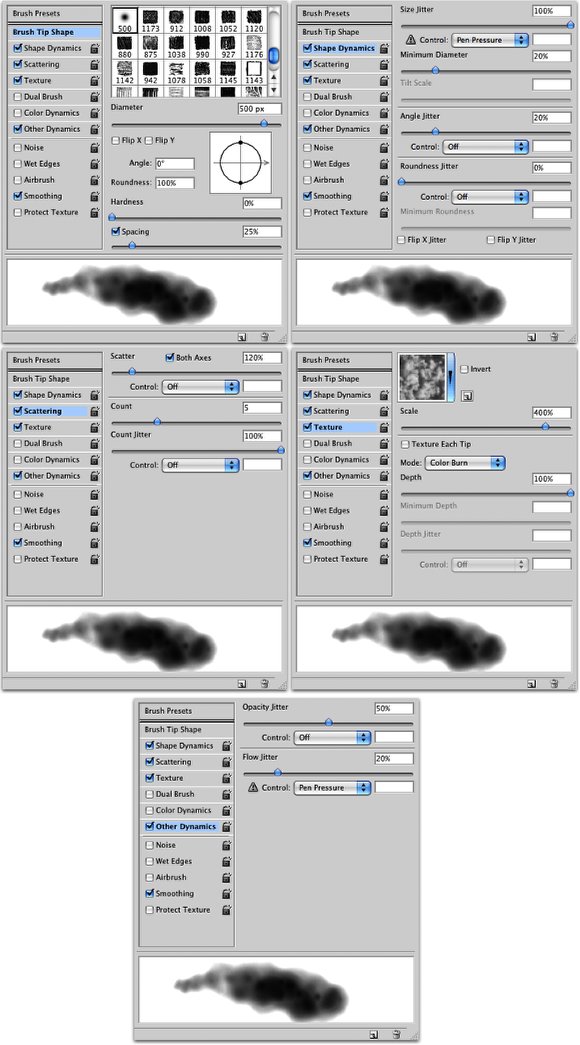
Step 3
For the Clouds I created a brush. It's really easy and I learned that from another tutorial I found online, you can see the video here. But I decided to show you the screenshots too, because it's easier to follow. Basically create a brush and use this settings:
Step 4
Now add a new layer and select white for the color. Choose the Cloud brush and start painting the cloud. The secret here is paiting it very slowly, click by click until you get the shape you want.
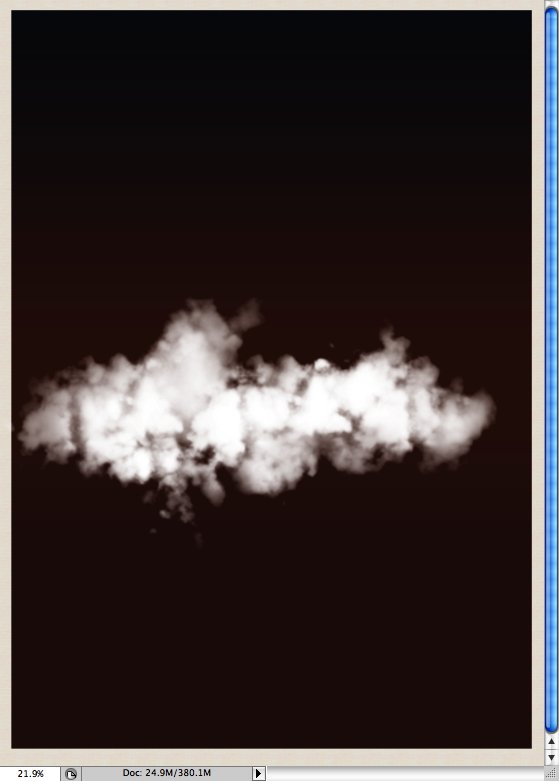
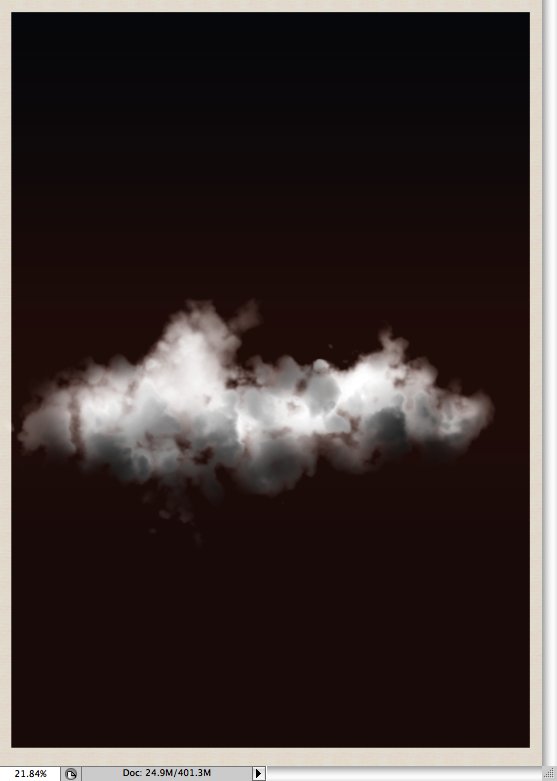
Step 5
The previous step we created the first part of the cloud, but to make it look more volumetric and realistic you will have to create some dark areas. Add another layer on top of the white cloud and go to Layer>Create Clipping Mask. Select black for the color and change the Brush Opacity to 50% (press 5). Then start painting the dark areas. If you look at some real clouds you will notice that these dark areas are always at the bottom of the clouds, so do the same.
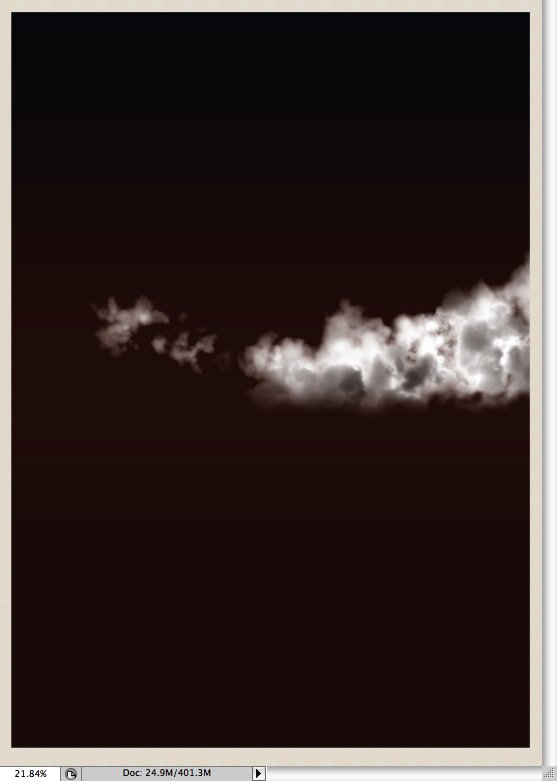
Step 6
Paint one cloud and move it to the right side of the page like the image below.
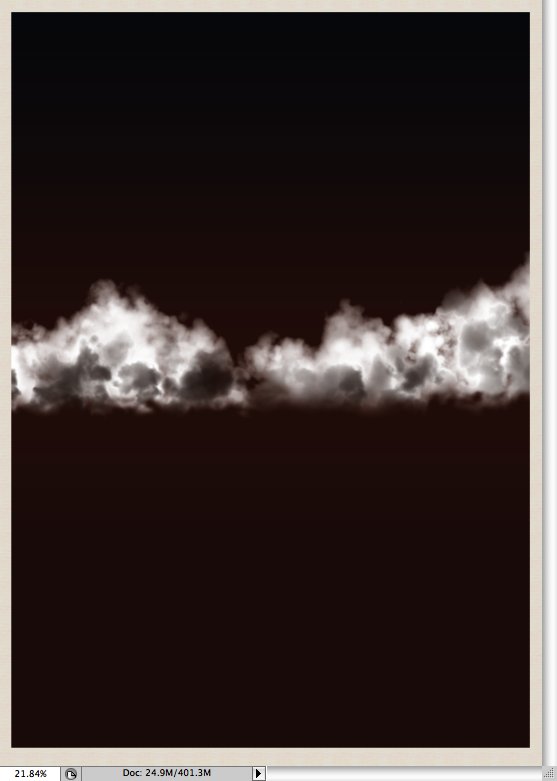
Step 7
Create another cloud and place it on the other side.
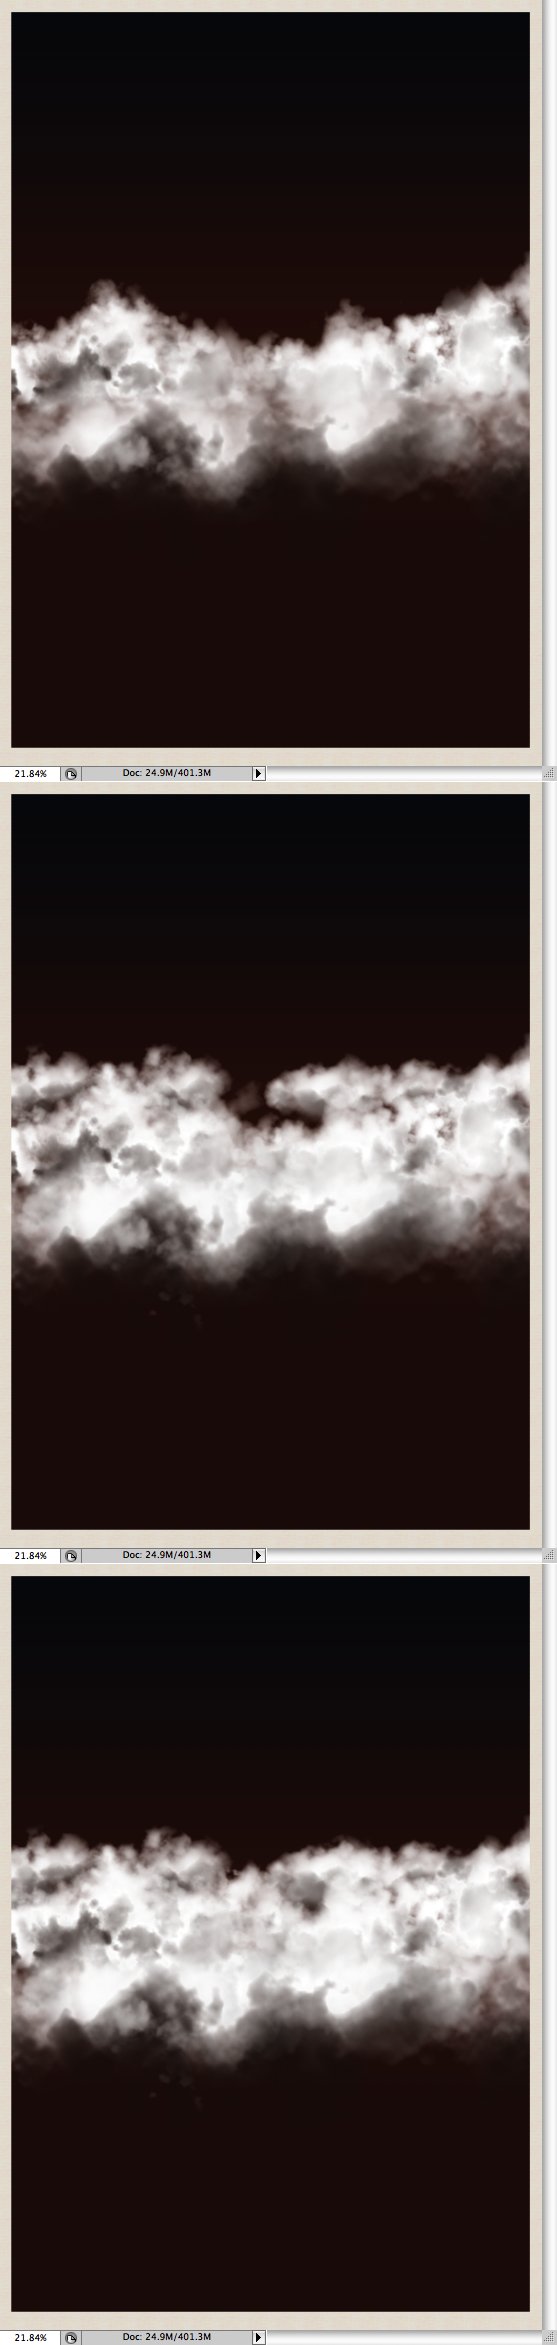
Step 8
Now create a big cloud, remember if you increase the size of the brush you will have to increase the size of the pattern of the brush preset. Also create smaller ones too, so you can create so sort of persepective. The biggers in the front of the document and go reducing the size to those that are in the back.
Step 9
Add a new layer and fill it with a gradient. Use #291907 and #dad6d2 for the colors, then change the Blend Mode to Overlay.

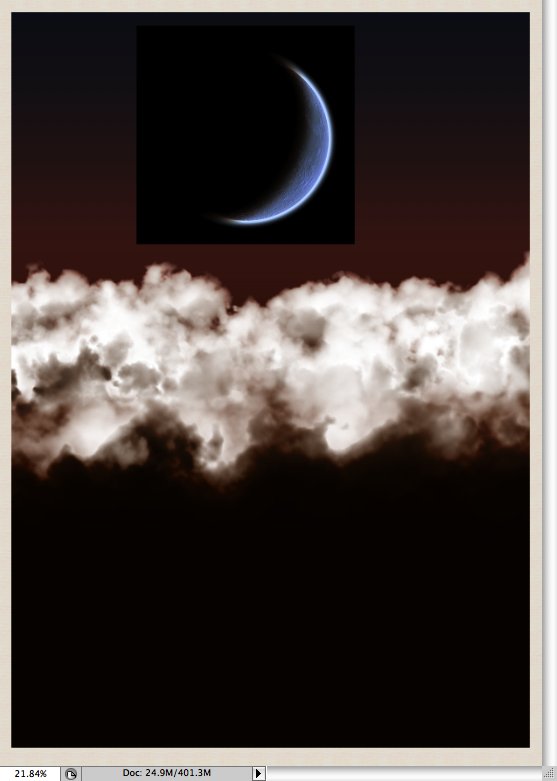
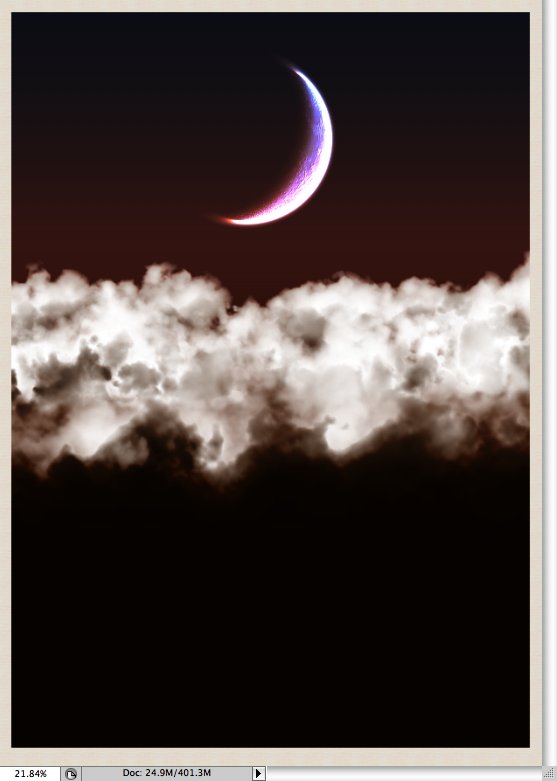
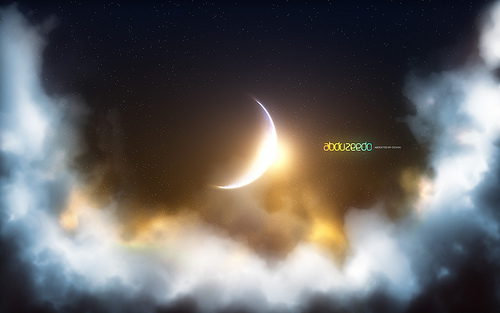
Step 10
Here I decided to get a photo of a moon instead of creting one, that could easily be done too, but my goal was to create only the clouds from scratch, at least this time. So I used an image and you can donwload it here.
Step 11
Change the Blend Mode of the Moon layer to Color Dodge and duplicate the layer so the moon will get shinner.
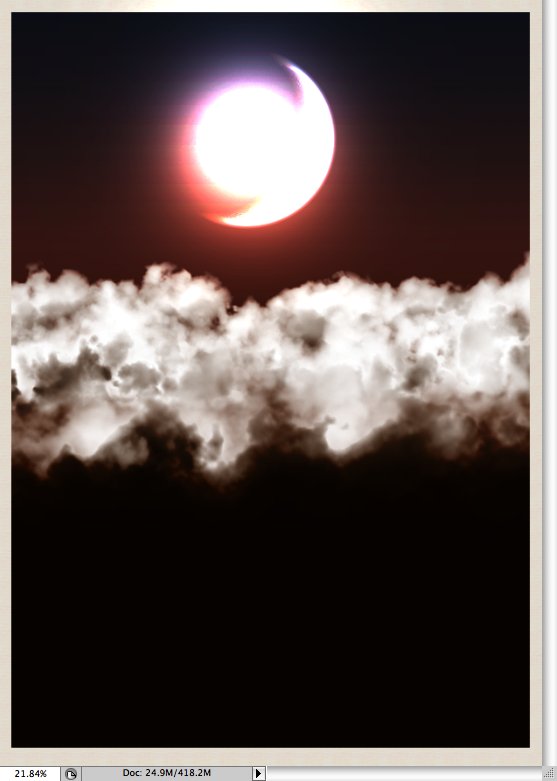
Step 12
Add a new folder in the Layer Palette and change the Blend Mode to Color Dodge. This folder will be beneath the Moons' layers. After that inside this folder, add a new layer and select white for the color. With the Brush Tool (B) select a basic round brush very soft, 0% hardness, and 20% opacity. Make it slightly larger than the moon, use the [ and ] to reduce or increase the size of the brush. Then start painting the light, use the image below for reference.
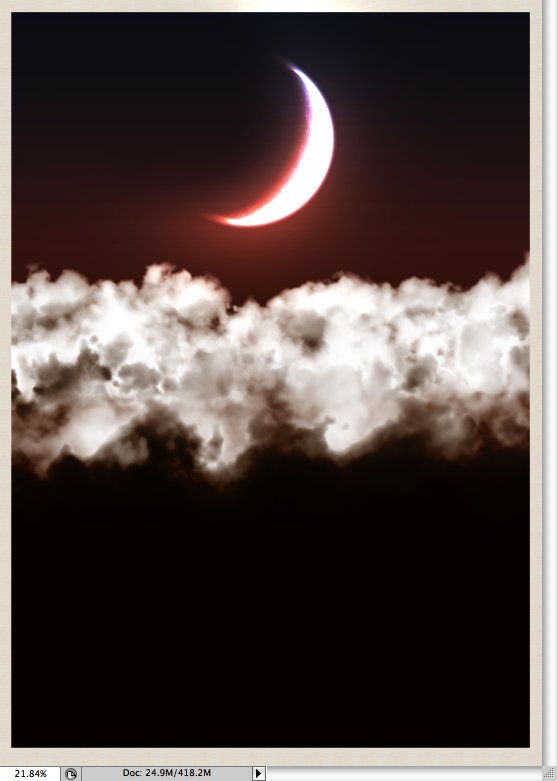
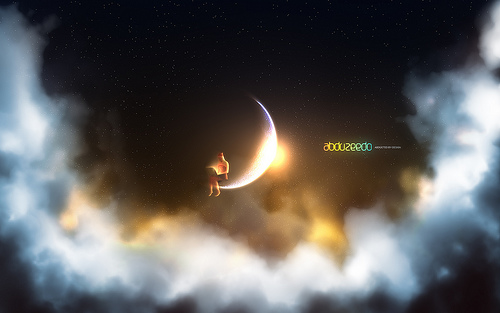
Step 13
Select the Eraser Tool (E) and start deleting the area of the moon that won't be illuminated.
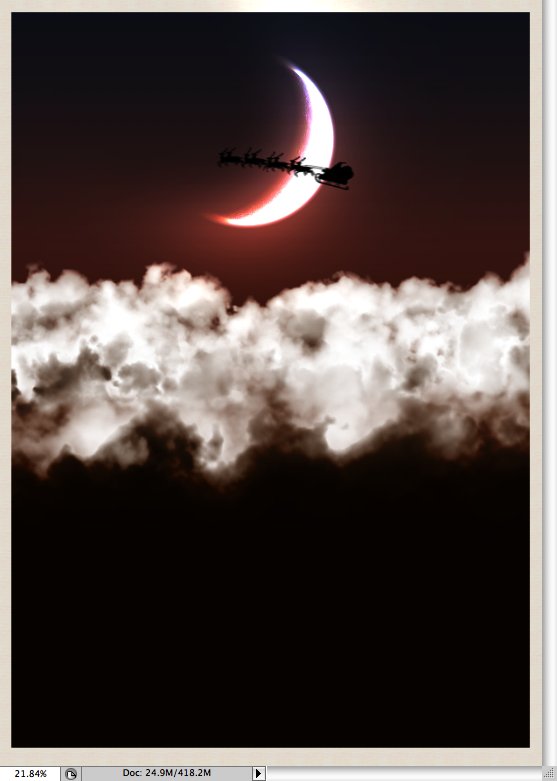
Step 14
Here let's add our Santa Claus's reindeer, you can find lot sof images on the web or if you prefer you can buy a very nice vector at iStockphoto.com
Step 15
In this step I just added some stars, I have written quite a few tutorials showing how to create stars in Photoshop so you can check that out this tutorial. Add the layers beneath all the other layers and, also, delete the area beneath the moon, even the dark area.
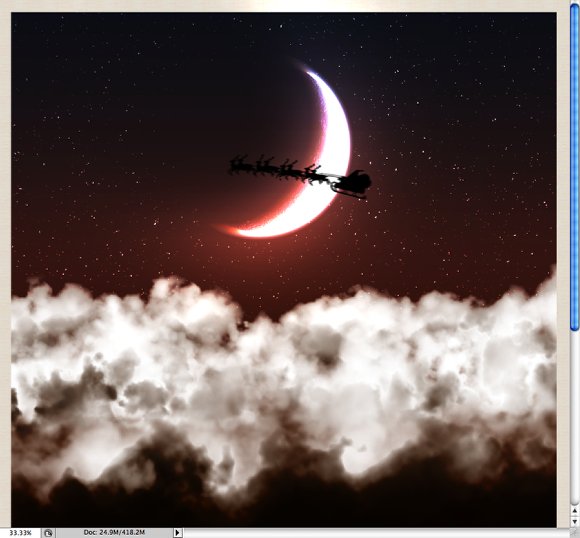
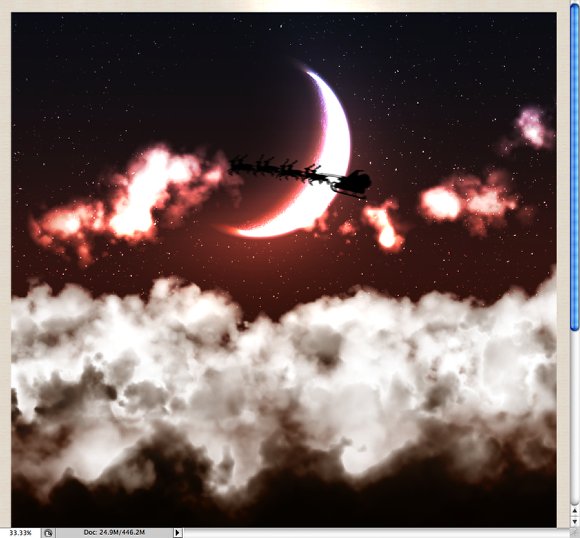
Step 16 - Aurora Borealis
To create the Aurora Borealis effect, add a new folder in the Layer Palette, rename it to "aurora" and change the Blend Mode to Color Dodge. Inside the folde add a new layer a and select the Brush Tool (B). Get the Cloud brush you created for the clouds and paint some clouds, use the image below for reference.
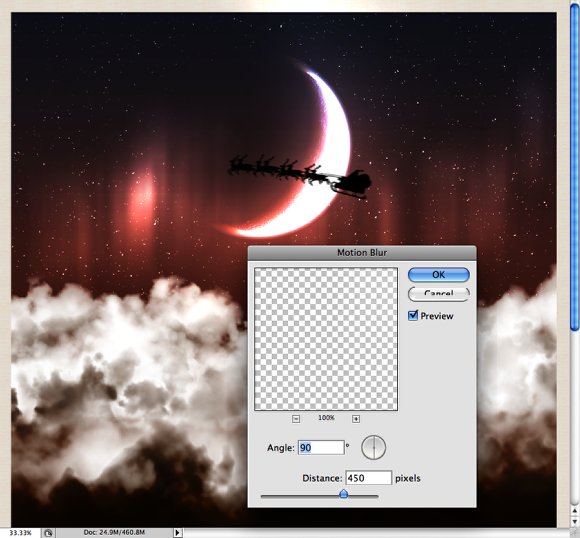
Step 17
Go to Filter>Blur>Motion Blur. Use 90° for the Angle and 450 pixels for the Distance.
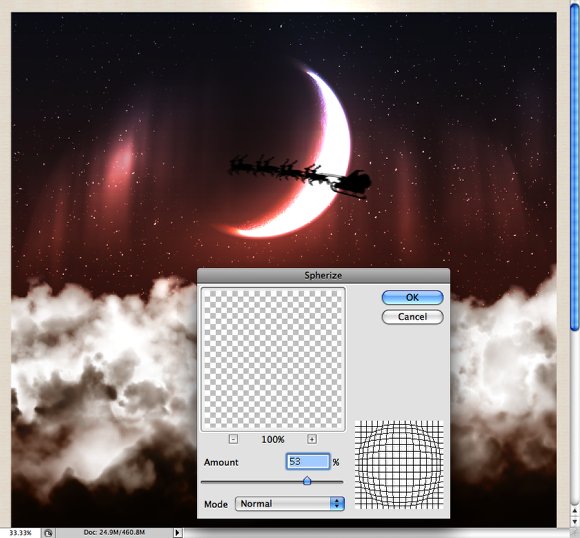
Step 18
Now go to Filter>Distort>Spherize. Use 53% for the Amount and Normal for the Mode
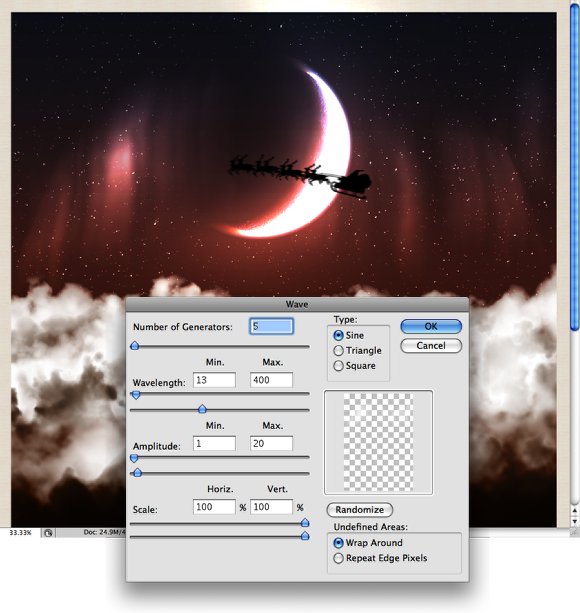
Step 19
The last filter for the Aurora Borealis effect is a little wave distortion. Go to Filter>Distort>Wave. Use the image below for the values.
Step 20
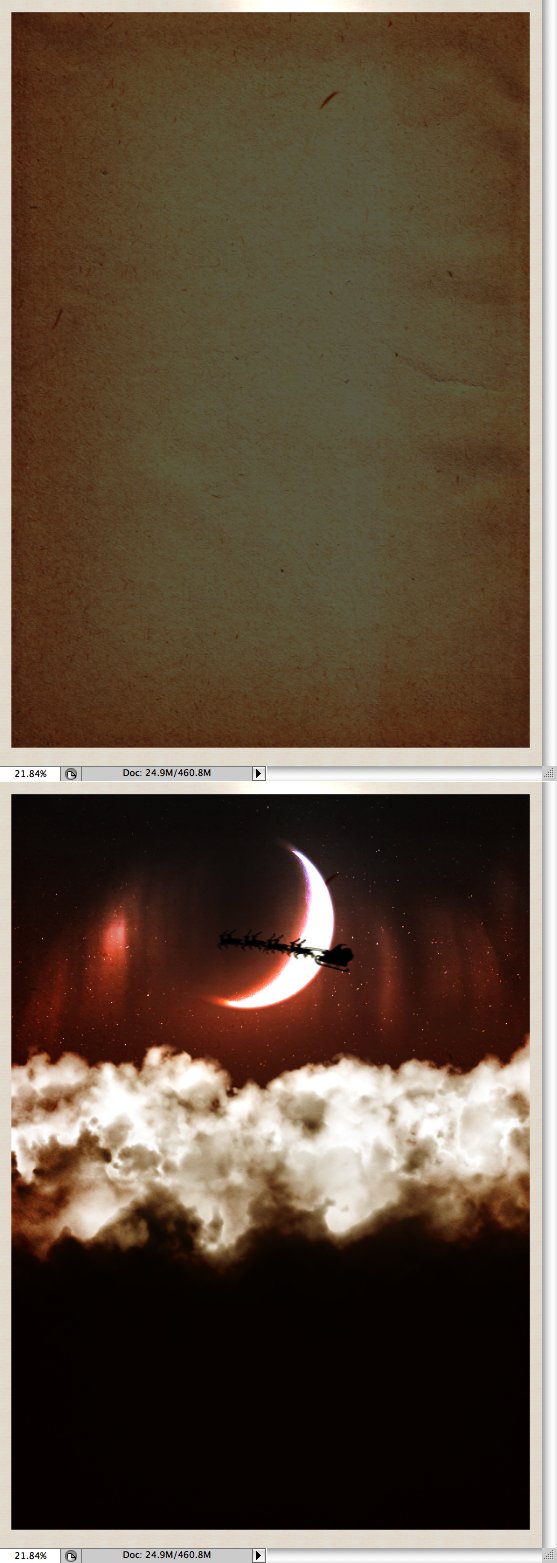
My first idea for the design was to give it a nice vintage style. To do that I used some texture. Just add some textures on top of the other layers and try different bend modes and opacities. In this case I used an old paper image with Overlay for the Blend Mode.
Step 21
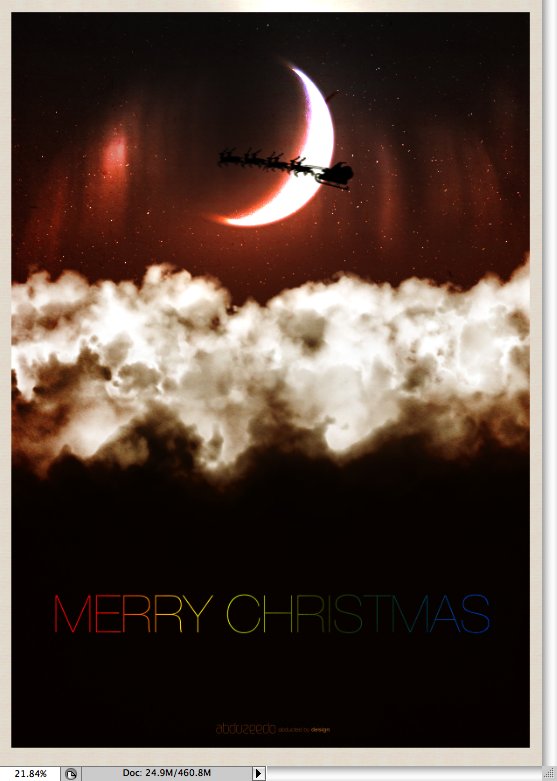
Here add the text and logos and group all layers. Rename the group to "card" and duplicate the group. With the duplicated group selected go to Layer>Merge Group.
Step 22
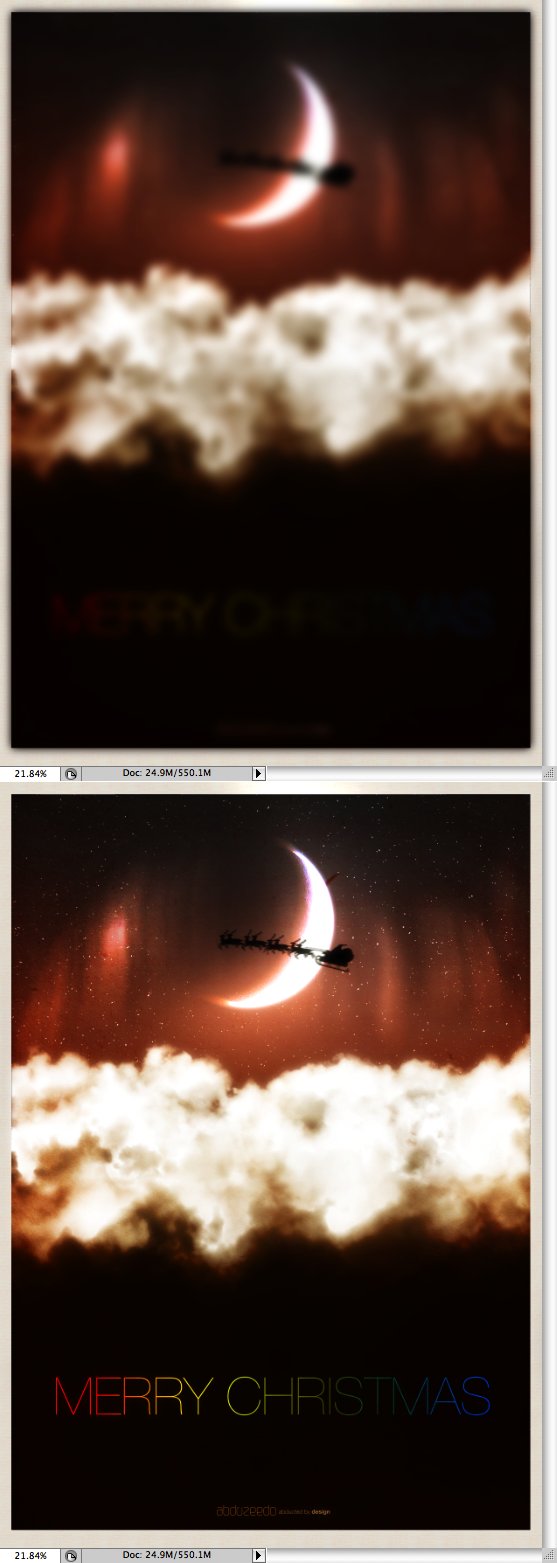
With the merged layer selected go to Filter>Blur>Gaussian Blur. Use 20 pixels for the Radius and a change the Blend Mode to Screen. Then with the Eraset Tool (E) delete some areas that won't need to be so bright, Basically leave just the clouds and the moon, and deleted the rest of the the image.
Conclusion
You can add more effects like using brushes and masks to create even more vinatage effects, like my final card. The idea of this tutorial was to show how to create more fluffy and realistic clouds, once again I used references from other tutorials on the web. There are so many good tutorials online showing how to create some effects that then it's just adapt them to your needs. In my case I just added a few extra steps to create my clouds. I hope you enjoy the tutorial and a Merry Christmas to everyone ;)

Other Examples
Create a new document in Photoshop. For this image I chose the A4 format. You can find it under the International Paper Preset. Then in the Background layer and apply a Layer Style with Pattern Overlay. For the Pattern, select the Linen Weave, it's a default pattern in Photoshop.
Step 2
Add a new layer and create a rectangle with the Rectangle Tool (U). Make it slightly smaller than the background, so it will have some borders. After that apply a Gradient Overlay via Layer Styles. Use Linear for the Type, 90° for the Angle and for the colors use: #12141c, #3e221a, #341f1b.
Step 3
For the Clouds I created a brush. It's really easy and I learned that from another tutorial I found online, you can see the video here. But I decided to show you the screenshots too, because it's easier to follow. Basically create a brush and use this settings:
- Brush Tip Shape: Round shape, 500px Diameter, 0% Hardness, 25% Spacing.
- Shape Dynamics: 100% Size Jitter, 20% Minimum Diameter, Angle Jitter 20%, Roundness Jitter 0%.
- Scattering: Scatter Both Axes and 120%, Count 5, Count Jitter 100%.
- Texture: Select Clouds for the Pattern, 400% for the Scale (but you can make it bigger if you want the couds softer and you will have to reduce the size if you want a smaller brush). Mode Color Burn
Step 4
Now add a new layer and select white for the color. Choose the Cloud brush and start painting the cloud. The secret here is paiting it very slowly, click by click until you get the shape you want.
Step 5
The previous step we created the first part of the cloud, but to make it look more volumetric and realistic you will have to create some dark areas. Add another layer on top of the white cloud and go to Layer>Create Clipping Mask. Select black for the color and change the Brush Opacity to 50% (press 5). Then start painting the dark areas. If you look at some real clouds you will notice that these dark areas are always at the bottom of the clouds, so do the same.
Step 6
Paint one cloud and move it to the right side of the page like the image below.
Step 7
Create another cloud and place it on the other side.
Step 8
Now create a big cloud, remember if you increase the size of the brush you will have to increase the size of the pattern of the brush preset. Also create smaller ones too, so you can create so sort of persepective. The biggers in the front of the document and go reducing the size to those that are in the back.
Step 9
Add a new layer and fill it with a gradient. Use #291907 and #dad6d2 for the colors, then change the Blend Mode to Overlay.
Step 10
Here I decided to get a photo of a moon instead of creting one, that could easily be done too, but my goal was to create only the clouds from scratch, at least this time. So I used an image and you can donwload it here.
Step 11
Change the Blend Mode of the Moon layer to Color Dodge and duplicate the layer so the moon will get shinner.
Step 12
Add a new folder in the Layer Palette and change the Blend Mode to Color Dodge. This folder will be beneath the Moons' layers. After that inside this folder, add a new layer and select white for the color. With the Brush Tool (B) select a basic round brush very soft, 0% hardness, and 20% opacity. Make it slightly larger than the moon, use the [ and ] to reduce or increase the size of the brush. Then start painting the light, use the image below for reference.
Step 13
Select the Eraser Tool (E) and start deleting the area of the moon that won't be illuminated.
Step 14
Here let's add our Santa Claus's reindeer, you can find lot sof images on the web or if you prefer you can buy a very nice vector at iStockphoto.com
Step 15
In this step I just added some stars, I have written quite a few tutorials showing how to create stars in Photoshop so you can check that out this tutorial. Add the layers beneath all the other layers and, also, delete the area beneath the moon, even the dark area.
Step 16 - Aurora Borealis
To create the Aurora Borealis effect, add a new folder in the Layer Palette, rename it to "aurora" and change the Blend Mode to Color Dodge. Inside the folde add a new layer a and select the Brush Tool (B). Get the Cloud brush you created for the clouds and paint some clouds, use the image below for reference.
Step 17
Go to Filter>Blur>Motion Blur. Use 90° for the Angle and 450 pixels for the Distance.
Step 18
Now go to Filter>Distort>Spherize. Use 53% for the Amount and Normal for the Mode
Step 19
The last filter for the Aurora Borealis effect is a little wave distortion. Go to Filter>Distort>Wave. Use the image below for the values.
Step 20
My first idea for the design was to give it a nice vintage style. To do that I used some texture. Just add some textures on top of the other layers and try different bend modes and opacities. In this case I used an old paper image with Overlay for the Blend Mode.
Step 21
Here add the text and logos and group all layers. Rename the group to "card" and duplicate the group. With the duplicated group selected go to Layer>Merge Group.
Step 22
With the merged layer selected go to Filter>Blur>Gaussian Blur. Use 20 pixels for the Radius and a change the Blend Mode to Screen. Then with the Eraset Tool (E) delete some areas that won't need to be so bright, Basically leave just the clouds and the moon, and deleted the rest of the the image.
Conclusion
You can add more effects like using brushes and masks to create even more vinatage effects, like my final card. The idea of this tutorial was to show how to create more fluffy and realistic clouds, once again I used references from other tutorials on the web. There are so many good tutorials online showing how to create some effects that then it's just adapt them to your needs. In my case I just added a few extra steps to create my clouds. I hope you enjoy the tutorial and a Merry Christmas to everyone ;)
Other Examples


